How to Use Virtual Tour
Here are some helpful instructions on how to navigate this Virtual Tour, to begin, you will need to have the Quicktime Plug-in installed onto your computer, if you do not have this plug-in, please click the link to download free software first. Once installed, you may need to restart your computer for this plug-in to activate. Please follow all installation instructions on the download to have the plug-in properly installed.
The
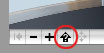
Tour begins at the entrance of the exhibit and to navigate on the panoramic
image window there are three helpful buttons on the bottom of each panoramic
screen that will let you zoom in and out of the window itself:
 Zoom Out Button
 Zoom In Button
And
there are built-in Hotspots throughout the panoramic scenes and as move
through each scene they will change your pointer to a globe image when
you hover over these hotspots, but to see all hotspots you can select
the hotspot button and all hotspots in that scene will be highlighted
 Hotspot
Button
Hotspot
Button
An additional feature of this Virtual Tour is that there are embedded
audio files on selected scenes and also individual pieces of artwork that
have been selected as a hotspot item and the following graphic within
a selected panoramic scene indicates an embedded audio file and can be
activated to play while you browse through that individual scene or painting
description.
![]() Audio
Controls
Audio
Controls
To change scenes you can navigate within each panoramic scene with the
hotspots buttons are within each scene and that will move you throughout
the whole tour, if at anytime you want to get out of a panoramic scene,
you can also click on the scene you are wanting to move to by going over
to the exhibit plan drawing on the right and select the scene location
indicator and that will bring directly to that point in the exhibit.
 Scene
Location Indicator
Scene
Location Indicator